• Skip to primary navigation
  • Skip to main content
  • Skip to primary sidebar
  • Skip to footer
Hardware Secrets

Hardware Secrets

Uncomplicating the complicated

  • Case
  • Cooling
  • Memory
  • Mobile
    • Laptops
    • Smartphones
    • Tablets
  • Motherboard
  • Networking
  • Other
    • Audio
    • Cameras
    • Consumer Electronics
    • Desktops
    • Museum
    • Software
    • Tradeshows & Events
  • Peripherals
    • Headset
    • Keyboard
    • Mouse
    • Printers
  • Power
  • Storage
Home » Aerocool Strike X Fan Controller Review

Aerocool Strike X Fan Controller Review

[nextpage title=”Introduction”]

The Aerocool Strike X is a touchscreen fan controller with five channels and five thermometers. Let’s check it out.

The Strike X uses two 5.25″ bays and has a very colorful touchscreen. Its box is simple, with a picture of the product on it.

Aerocool Strike XFigure 1: Box

Figure 2 shows the box contents: the fan controller itself, manual, cables, screws, sticker tape (to attach the temperature sensors), spare cables, and a black front frame.

Aerocool Strike X
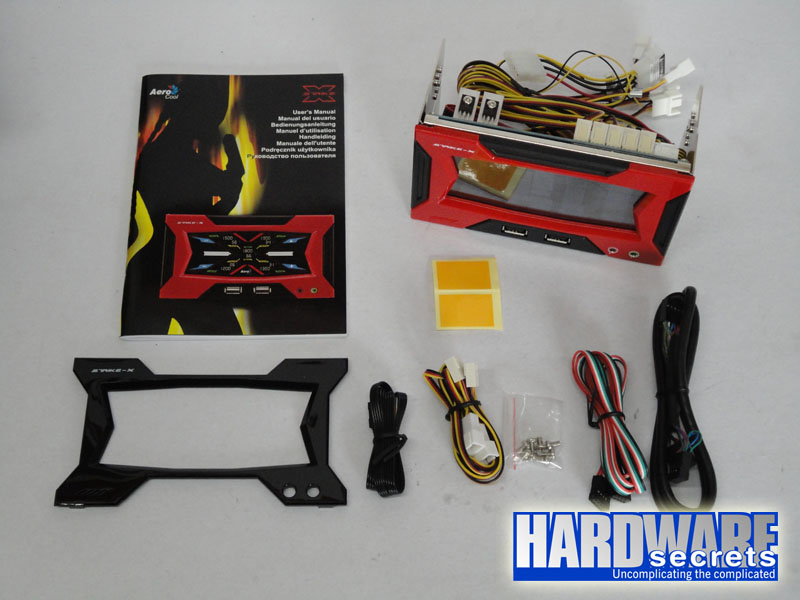
Figure 2: Box contents

This fan controller will be discussed in detail in the following pages.

[nextpage title=”The Aerocool Strike X”]

The fan controller uses two 5.25″ bays. It has two USB ports, a pair of headset connectors at the bottom, and a touchscreen at the center. The red frame shown in Figure 3 can be exchanged for a black one that comes with the product, in order to match your preference. Figure 4 displays the controller with the blank frame installed.

Aerocool Strike XFigure 3: Front panel

Aerocool Strike XFigure 4: Front panel with black frame

Figure 5 presents the rear side of the controller, revealing the circuit board. All the cables are connected to the device with removable connectors, but the temperature sensors have the connectors glued to the board.

Aerocool Strike XFigure 5: Rear side

Figure 6 exhibits the side of the controller, where you see the holes for the screws.

Aerocool Strike XFigure 6: Side view

[nextpage title=”Installation”]

The installation of the Strike X is easy. You just need to open two 5.25″ bays on your case, put the panel in place, attach four screws, connect the cables, and install the temperature probes.

Figure 7 presents the product cables. The power cable, shown at the right side, must be connected to the power supply. The temperature sensors (at the left) must be attached to the “hot spots” you want to monitor.

Aerocool Strike XFigure 7: Cables

The fan connectors have three pins, as seen in Figure 7. An exception is the channel one, shown in Figure 8, which is compatible with four-pin fans (however, the PWM control pin is not used). This connector also has an auxiliary connector that allows your motherboard to receive the fan rotation signal, which makes this channel the logical choice for the CPU cooler fan.

Aerocool Strike XFigure 8: Channel one fan connector

Unlike the F6XT fan controller, the Strike X is not compatible with fans that use a four-pin standard peripheral power connector.

You can also install the cables that allow you to use the USB ports at the panel, and/or the audio cable that enables the mic and headphones connectors. It is a great idea to make those cables modular, so if you will not use the USB or audio ports, you can leave the respective cable in the product box, reducing the amount of wires inside your computer. You can also remove the fan cables you are not using, helping to reduce the wire mess inside your case.

The controller also comes with two spare fan cables and two spare temperature probes in case you damage some of them.

[nextpage title=”Operation”]

The operation of the Aerocool Strike X is easy, but most of the colorful lines on the screen are there only for decorative purposes. The useful information is the five temperature readings and the five fan speeds.

You can touch the “C/F” icon to choose the temperature unit (Celsius or Fahrenheit degrees). The lock icon at the upper right allows you to lock and unlock the touchscreen; the product automatically locks the screen after 30 seconds of use, and you must always unlock it before adjusting anything.

The Strike X has temperature alarms for each channel. To adjust the alarm temperature of a channel, touch the temperature digits, and use the “+” and “-” icons to set it. If the sensor temperature becomes higher than the value set, an audible alarm sounds.

There is also an alarm for a disconnected or a stopped fan.

To adjust the fan speed of a channel, touch the rpm digits of the channel you want to adjust, using the “+” and “-” icons, then touch the digits again to store the new speed. The actual speed of the fan does not change immediately, however; it takes several seconds to apply the new speed to the fan, which makes the task of finding the best noise/cooling ratio a little annoying.

There is no way to completely turn off one fan; the least possible rpm is half the maximum rpm.

You can turn off the panel lights by pressing the Aerocool logo at the bottom of the screen for a few seconds.

There is no way to automatically control a fan speed according to a sensor temperature.

Aerocool Strike XFigure 9: The Strike X working

[nextpage title=”Main Specifications”]

The main specifications for the Aerocool Strike X fan controller include:

  • Front Panel: Plastic
  • Temperature sensors: Five
  • Fans controlled: Five
  • USB ports: Two
  • e-SATA ports: None
  • Used bays: Two 5.25″ bays
  • Maximum fan power: 8 W per channel
  • More information: https://www.aerocool.us
  • Average price in the US*: USD 58.00

* Researched at Amazon.com on the day we published this review.

[nextpage title=”Conclusions”]

The Aerocool Strike X is a very flashy fan controller, and its look may not please people who
like more austere-looking hardware. However, it is great as a five channel thermometer. And it controls fans, too.

Strong points

  • Five thermometers on the screen
  • Programmable temperature alarms
  • Alarm for stopped or disconnected fan
  • Great looks (if you like colorful gadgets)
  • You can remove unused cables

Weak points

  • Cannot turn off a fan
  • Doesn’t have any kind of automatic fan control
  • Takes too much time to apply speed settings to the fans

Reader Interactions

Leave a Reply Cancel reply

Your email address will not be published. Required fields are marked *

Primary Sidebar

As a participant in the Amazon Services LLC Associates Program, this site may earn from qualifying purchases. We may also earn commissions on purchases from other retail websites.

car service

Why Is Fleet Maintenance Important?

If you have a fleet of vehicles you use within your business, it’s crucial you keep up with their

Playing Fifa on Play station 4

Tips for Recycling Your Gaming Consoles and Devices

These days, it seems like almost everybody is gaming. As great as this is, it’s also creating a

Business planning

How to Develop Your Venture Capital Business

Venture Capital (VC) is a type of private equity investment in which investors provide funding to

Footer

For Performance

  • PCI Express 3.0 vs. 2.0: Is There a Gaming Performance Gain?
  • Does dual-channel memory make difference on integrated video performance?
  • Overclocking Pros and Cons
  • All Core i7 Models
  • Understanding RAM Timings

Everything you need to know

  • Everything You Need to Know About the Dual-, Triple-, and Quad-Channel Memory Architectures
  • What You Should Know About the SPDIF Connection (2022 Guide)
  • Everything You Need to Know About the Intel Virtualization Technology
  • Everything You Need to Know About the CPU Power Management

Copyright © 2023 · All rights reserved - Hardwaresecrets.com
About Us · Privacy Policy · Contact