• Skip to primary navigation
  • Skip to main content
  • Skip to primary sidebar
  • Skip to footer
Hardware Secrets

Hardware Secrets

Uncomplicating the complicated

  • Case
  • Cooling
  • Memory
  • Mobile
    • Laptops
    • Smartphones
    • Tablets
  • Motherboard
  • Networking
  • Other
    • Audio
    • Cameras
    • Consumer Electronics
    • Desktops
    • Museum
    • Software
    • Tradeshows & Events
  • Peripherals
    • Headset
    • Keyboard
    • Mouse
    • Printers
  • Power
  • Storage
Home » 3R System R120-V3 Case Review

3R System R120-V3 Case Review

[nextpage title=”Introduction”]

R120-V3 is based on the R120 case from the same manufacturer, where they removed the front LCD display/fan controller and added a module on the top with two 120 mm fans and two extra USB ports. Let’s take a look at this new release.

As you can see, the left panel is meshed with place for installing up to two 120 mm fans behind the available meshes, which feature air filters.

3RSystem R120-V3 caseFigure 1: 3RSystem R120-V3 case.

3RSystem R120-V3 case
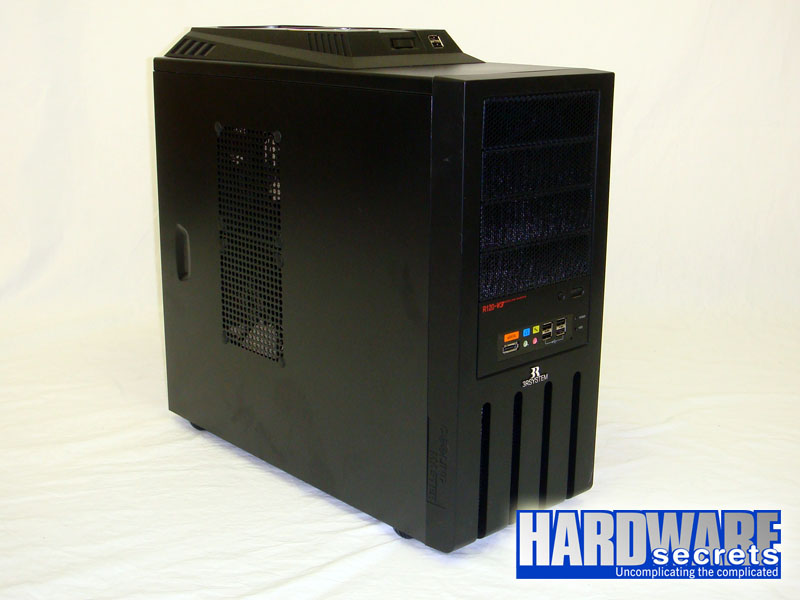
Figure 2: 3RSystem R120-V3 case.

R120-V3 has a very sober looks and no front door is present. On its front panel we have four 5.25” bays, all using meshed covers with air filters. A 120 mm fan (which rotates at 1,100 rpm) is present on the lower section between the front panel and the hard disk bays, behind the existing air intake openings. This fan features an air filter and uses a standard peripheral power connector, so you must connect it directly to the power supply.

3RSystem R120-V3 caseFigure 3: Front panel.

The reviewed case comes with four USB ports, one eSATA port and the traditional mic in and heaphones out jacks on its front panel.

3RSystem R120-V3 case
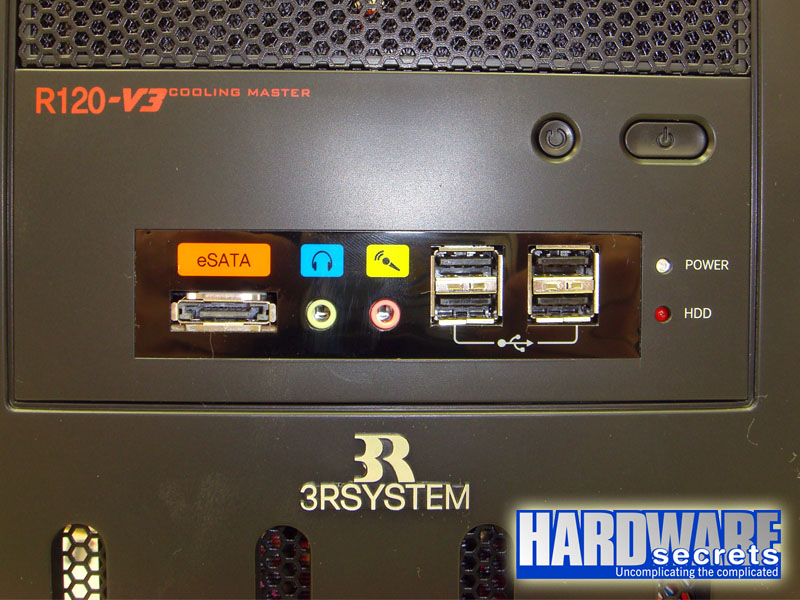
Figure 4: Connectors.

[nextpage title=”Introduction (Cont’d)”]

One of the highlights of this case is the cooling module present on its top panel, featuring two 120 mm fans (1,500 rpm maximum speed). These fans are connected to a switch where you can turn them off or configure them in two different speeds (low and high). Two extra USB ports are available on this module but in order to work they must be connected to regular USB ports located on the rear panel from the motherboard, so basically they are extensions from existing ports, not using motherboard headers.

3RSystem R120-V3 caseFigure 5: Top panel.

3RSystem R120-V3 caseFigure 6: Fan speed control and USB ports.

The bottom panel, portrayed in Figure 7, has two washable air filters.

3RSystem R120-V3 caseFigure 7: Bottom panel.

Finally we have the rear panel in Figure 8. As you can see, the rear panel is painted black, giving this case a very professional looks. The power supply is installed on the bottom part of the case and there is a 120 mm fan on the rear panel (rotating at 1,100 rpm and also using a standard peripheral power connector, so you need to connect it directly on the power supply). R120-V3 has seven expansion slots using solid covers. In Figure 8 you can also see the two USB connectors to be connected on the motherboard rear panel if you want to use the USB ports available on the top panel.

3RSystem R120-V3 caseFigure 8: Rear panel.

Now let’s take a look inside 3RSystem R120-V3.

[nextpage title=”Inside 3RSystem R120-V3″]

Both panels are fastened to the case using black thumbscrews, which is excellent. Before talking about the interior from R120-V3 we must talk about the left-side panel, shown in Figure 9. It has space for installing up to two 120 mm fans and feature washable air filters. One interesting thing about these meshes is that all the holes have the same diameter, so the exact location when installing one fan isn’t fixed: you can move the fan around and install it where you think it will provide the best airflow for your components. Of course if you install two fans then you can’t move them around.

3RSystem R120-V3 caseFigure 9: Left-side panel.

The interior from R120-V3 is painted black, giving this case an impressive looks. This case comes with an enormous hole on the motherboard tray for you to have access to the backplate from the CPU cooler, allowing you to replace it without having to remove the motherboard, and seven big holes for routing cables behind the motherboard tray.

3RSystem R120-V3 caseFigure 10: Overall look.

3RSystem R120-V3 caseFigure 11: A view from behind the motherboard tray.

This case allows the installation of video cards up to 11” (28 cm) long.

In Figure 12 you can have another overall look from inside R120-V3. On this picture you can see the rear and top fans. Daughter boards are fastened to the chassis using regular screws, but at least they are black.

3RSystem R120-V3 caseFigure 12: Overall look.

In Figure 13, you can see the power supply compartment. Notice the mesh with the air filter that we’ve already shown in Figure 7.

3RSystem R120-V3 caseFigure 13: Power supply compartment.

[nextpage title=”The Disk Drive Bays”]

3R System R120-V3 comes with four 5.25” bays. The top two c
ome with screwless retention mechanisms, but it is important to notice that differently from solutions found on other cases these mechanisms are available on both sides of the bays (see Figure 11).

3RSystem R120-V3 caseFigure 14: Bays.

The reviewed case has a removable hard drive cage that fits up to three drives, plus a 3.5” bay between the hard drive cage and the 5.25” bays. Hard drives are installed perpendicular to the case inside the cage, which is always nice. But what is really unique about this cage is the use of springs to make the drives to be literally suspended inside the cage, absorbing the noise produced by them.

3RSystem R120-V3 caseFigure 15: Hard disk drive cage removed from the case.

3RSystem R120-V3 caseFigure 16: Suspension mechanism.

This system, however, isn’t screwless: you need to attach regular screws to each coil.

In Figure 17, you can see the front 120 mm fan that cools down the hard disk drives. As mentioned before, it rotates at 1,100 rpm and uses a regular peripheral power connector, so it must be installed directly on the power supply.

3RSystem R120-V3 caseFigure 17: Front fan.

This case comes with a 6 19/64” (160 mm) EPS12V extension for you to extend the EPS12V cable from your power supply, a really interesting feature if you have a power supply with a short EPS12V/ATX12V cable, since on this case the power supply is installed on the bottom of the case. This extension can be also used as an adapter to convert an EPS12V connector into an ATX12V connector, since it uses two ATX12V connectors that together form one EPS12V connector at its end.[nextpage title=”Main Specifications”]

3RSystem R120-V3 case main specs include:

  • Style: Mid-tower
  • Application: ATX and smaller form factors derived from this one.
  • Material: Zinc-coated steel (SECC), painted black.
  • Power supply required: Doesn’t come with the product.
  • Available colors: Black.
  • Side panel: Meshed.
  • Dimensions: 16 ½” x 7 7/8” x 17 ¾” (42 cm x 20 cm x 45 cm) (H x W x D).
  • Net weight: 15.5 lbs (7.2 kg)
  • Gross weight: 18.5 lbs (8.4 kg)
  • Bays: Four external 5.25” bays and four internal 3.5” bays (three inside a removable hard disk drive cage).
  • Expansion slots: Seven.
  • Fans: One 120 mm on the front (1,100 rpm), one 120 mm on the rear (1,100 rpm) and two 120 mm on the top (1,500 rpm max) with off/low/high control.
  • Optional fans: Two 120 mm fans on the left panel.
  • More Information: https://www.3rsys.com
  • Suggested price: USD 88.00

[nextpage title=”Conclusions”]

3R System R120-V3 is an impressive product for the user that is looking for a good-quality case with nice features at an affordable price.

Strong Points

  • Meshed bay covers.
  • Hole in the motherboard tray for accessing the backplate of the CPU cooler.
  • Holes for routing cables on the motherboard tray with rubber covers.
  • eSATA port.
  • Six USB ports.
  • Air filters everywhere (top, front and bottom panels).
  • Speed control for the top fans.
  • Removable hard disk drive cage.
  • Screwless mechanisms for fastening 5.25” devices.
  • Unique suspension mechanism for hard disk drives.
  • No sharp edges where you could cut yourself while building your PC.

Weak Points

  • Slot covers could be meshed.
  • Could have come with thumbscrews for fastening expansion cards.
  • No screwless mechanism for holding hard disk drives.
  • The reduced number of hard disk drive bays may be a problem for more advanced users.

Reader Interactions

Leave a Reply Cancel reply

Your email address will not be published. Required fields are marked *

Primary Sidebar

As a participant in the Amazon Services LLC Associates Program, this site may earn from qualifying purchases. We may also earn commissions on purchases from other retail websites.

car service

Why Is Fleet Maintenance Important?

If you have a fleet of vehicles you use within your business, it’s crucial you keep up with their

Playing Fifa on Play station 4

Tips for Recycling Your Gaming Consoles and Devices

These days, it seems like almost everybody is gaming. As great as this is, it’s also creating a

Business planning

How to Develop Your Venture Capital Business

Venture Capital (VC) is a type of private equity investment in which investors provide funding to

Footer

For Performance

  • PCI Express 3.0 vs. 2.0: Is There a Gaming Performance Gain?
  • Does dual-channel memory make difference on integrated video performance?
  • Overclocking Pros and Cons
  • All Core i7 Models
  • Understanding RAM Timings

Everything you need to know

  • Everything You Need to Know About the Dual-, Triple-, and Quad-Channel Memory Architectures
  • What You Should Know About the SPDIF Connection (2022 Guide)
  • Everything You Need to Know About the Intel Virtualization Technology
  • Everything You Need to Know About the CPU Power Management

Copyright © 2023 · All rights reserved - Hardwaresecrets.com
About Us · Privacy Policy · Contact