Anatomy of an Optical Drive
Introduction
Contents
We disassembled a DVD burner to show you the main components you will find on an optical drive, like CD and DVD readers and burners. In this tutorial we will not only show all main components from an optical drive, but also teach you how disassemble an optical unit as well.
Contrary to hard disk drives, you can open optical units, but you cannot turn it on while it is open. The laser beam generated by the optical pickup unit is invisible and you can go blind if you look at it. Since it is invisible, you can’t have any clue where it is and if you are looking at it or not!
Before opening our DVD burner to show you how it looks like inside, let’s take a look at its connectors (see Figure 1).
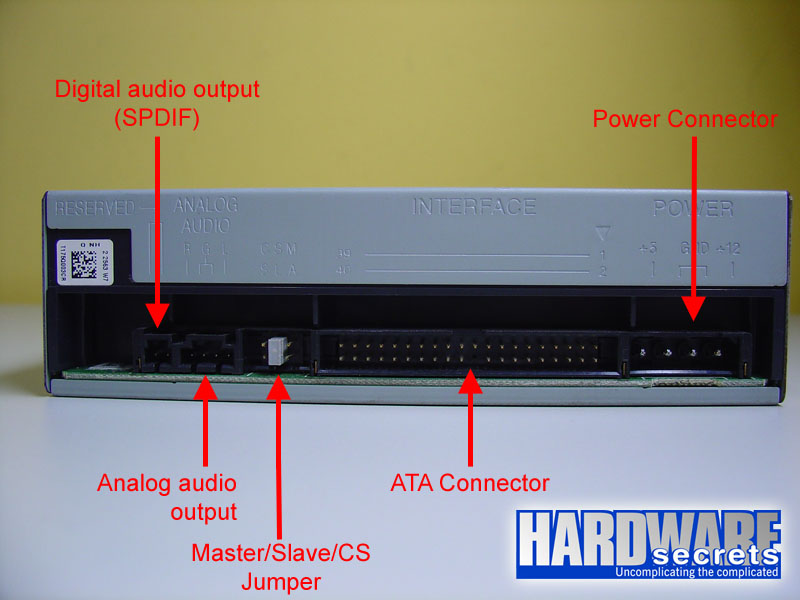 Figure 1: Connectors found on a typical optical unit.
Optical units have basically three connectors, one for power, one for exchanging data with the computer and one audio output (also called “analog audio output”), which should be connected to your sound card (or to your motherboard, if your motherboard has on-board audio).
Optical units can also have one digital audio output, which is also known as SPDIF (Sony/Phillips Digital Interface Format). If your optical unit has this connector, go for it. Since it transmits digital audio instead of analog audio, you will get a far better sound quality from your audio CDs and DVDs if you use this connection instead of the analog one. We’ve already written a full tutorial on this subject, so you may want to take a look at it to learn more about this.
The connector used for exchange data between the optical unit and the computer is better known as “interface”. The most common interface for end-users is called ATA (Advanced Technology Attachment). There other interfaces but they are very rare nowadays: SATA (Serial ATA), which was created to replace ATA and is still entering the market; SCSI (Small Computer Systems Interface), which is targeted to servers and rarely seen on PCs targeted to end-users; and proprietary, which was seen on the very first optical units (“1x” and “2x”CD-ROM units) before the ATA standard was changed to be compatible with optical units.
The master/slave jumper on ATA optical units can be configured in three different ways:
- Master: this means that this drive will be the only one attached to the cable that connects the optical unit to the computer.
- Slave: this means that this drive will be the second drive attached to the cable that connects the optical unit to the computer.
- CS (Cable Select): this means that you will use a “special” cable (called CS cable) that the configuration of whether a drive will be master or slave will be made by the position of the unit on the cable and not by a jumper configuration on the drive.
You can mix hard disks and optical units on the same cable. However, this is not recommended due to performance issues. The best way to connect an optical unit to your computer is as single drive (as “master”) on the secondary ATA port on the motherboard, while connecting the hard disk drive alone on the primary ATA port as “master” as well, using a different cable.
Before opening the unit to show how it looks like inside, let’s talk about an old trick that will be necessary for opening the unit: the manual ejection.